
Administration Guide
Planning your system
Building a well designed system
Planning is an essential component of building your WebDesk System. Figure 1 below illustrates the minum recomended artecture for a production environment. Multiple display servers and multiple WebDesk servers are supported. Both server types scan be scaled laterally of vertically as needed. Thorugh expansion of the VM applance parameters (latteral expansion) or the addition of new servers (vertical expansion). If a server is experencing high load, latteral expansion, espally with WebDesk servers is preffered over vertical expansion. When planning your system it is critical to ensure that only one MySQL database is used, as this servers as the core of your system. The webdesk servers must also mount a single NFS server for the files application, however if using one WebDesk server an internal mountpoint in the VM cam be used.
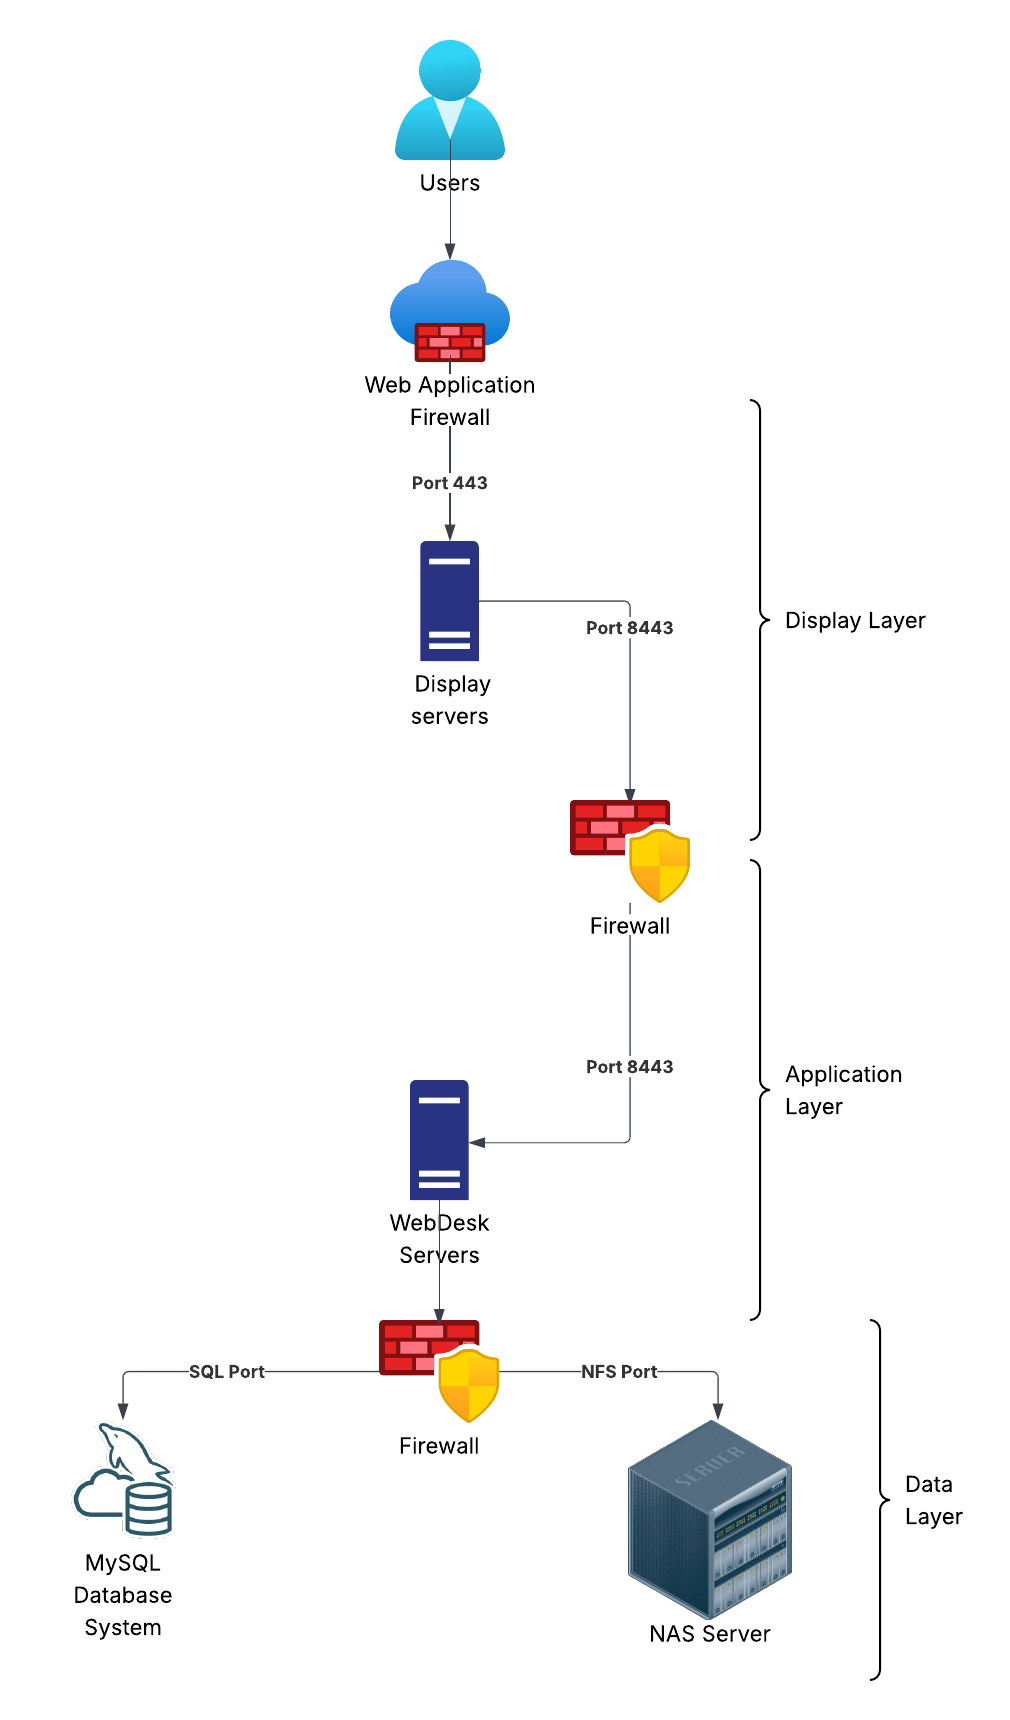
Figure 1 – A simple WebDesk system
This design provides three laters with logical firewalling between each layer to provide the maximum level of isolation between systems and limit the possible north / south motion of a potential attacker. WebDesk servers utilize a self signed certificate that can if required be replaced by the customer. Display servers can either in the the appliance form factor or a customer installed and mainined Apache 2 instance. Display servers can be customized to meet the graplical requirements of the customer. However it is important to note that changes that invalidate the configuration may require the server to be reinstalled. Therefore changes to the display server should be properly tested and validated before been used in production.
Installing
Install the database schema
- Download the latest database schema from downloads.
- Deploy the SQL file to your MySQL instance.
- Create a server access user with full rights to all database tables.
- Record the username and password and connection information for later reference
Install an application appliance
- Download the Webdesk appliance OVA file from downloads
- Start the appliance
- login to the appliance with the credentials:
- Username: admin
- Password: GoWebDesk!
- sudo to root
- sudo su
- Run the install script:
- ⚠️The install script requires an internet connection and may take some time.
- ./home/webdesk/wd_scripts/install.sh
- run the configuration script:
- ./home/webdesk/wd_scripts/configure.sh
- The script will guide your configuration.
- As this is the primary server select Y to the “primary server” prompt.
- Provide the FQDN that will be used for this system
- Only one primary server can exist per environment.
- The primary server performs indexing, security and cleanup functions.
- start the service
- systemctl start webdesk
Secure the appliance
Configure SSL certificates.
For cusotmer managed certificates:
- Generate gunicorn.key and gunicorn.pem
- Save the files in /home/webdesk/certs
- Copy the CRT file to the display appliance
To generate a self signed certificate:
- As root cd to /home/webdesk/wd_scripts
- Run ./ss_cert.sh
- Follow the prompts]
- Copy the CRT file to the display appliance
Change the default password
Change the password for the admin user
- Type exit to return to the admin user
- run passwd to change the admin password
Repeat this section for any additional servers.
Install an display appliance
Configure Apache
- Download the Webdesk appliance OVA file from downloads
- Start the appliance
- Copy the Application Server certificate to /etc/ssl/certs/gunicorn.crt
- login to the appliance with the credentials:
- Username: admin
- Password: GoWebDesk!
- sudo to root
- sudo su
- Edit /etc/apache2/sites-enabled/000-default-le-ssl.conf
- Update the ServerName to reflect your system
- Update SSLProxyCACertificateFile if needed
- Updarte Define APP_SERVER to point to the Application appliance:
- Example: Define APP_SERVER https://10.0.0.11:8443
- Under local SSL provide the location of the display servers certficates and keys.
- Save the file
- Restart apache systemctl restart apache2
Change the default password
Change the password for the admin user
- Type exit to return to the admin user
- run passwd to change the admin password
Repeat this section for any additional servers.
First login
- Conenct to any deployed display server in a web browser using HTTPS.
- ensure the domain is local
- Enter admin and the password provided during the configuration of the primary server.
- Inital login should provide the Admin, Files and Audit applications by default.
Admin Portal
Users Tab
This provides the ability to create and update local users defined on the webdesk system. LDAP, Active Directory and SAML users will automatically be created. However it is important to note that these external users will have their home login domain appended to the username with the @ symbol for example user@myaws or user@ad_server. These users will also be created in a locked state, as security is managed by the external authentication source provided in the login domain. It is important not to manage external users from the admin console unless a local override is required.
Local override
In the even that the external authentiction provider is unreahcabe local override can be used to provide emergency access to the system using the following procedure. This is however designed for temporary emengecy access and, due to the face that many security features are bypassed should never be used long term.
- Select the user you whish to override.
- Provide a password for the user.
- Select the enabled checkbox.
- Save the user.
- Ask the user to login, using the local domain and their full webdesk username for example user@brokenldap
- Once the tehnical issue has been resolved disable the local account.
Working with groups
Inside the WebDesk system groups provide the mapping between users and appplications. Local users are mapped in the user account object itself. LDAP and AD users are mapped based on the group attributes that are returned from the directory. Groups must be manually created with with identical names to the AD / LDAP group for map to the webdesk group and linked applications. If a group does not exist in WebDesk the mapping is ignored. For SAML groups the SAML ID must match the group ID provided in the SAML assertion. By design the SAML ID is independent from the group name, allowing for human readable names in the admin console.

Figure 2 – Group mapping diagram
Working with Applications
Applications can only be linked to groups, providing the interface between the group and the application itself thorugh a group mapping. Two configurable options are avalable.
Open As – Defines if an application opens in a new tab or replaces the desktop.
Status – Provides three states:
- Enabled – Application can be used.
- Disabled – Application is shown on desktop but flagged as disabled.
- Hidden – Application is not shown on the desktop.
Status operates independently of group mapping therefore, if multiple groups are mapped to an application setting a status of disabled will remove access for all groups.
Working With Settings
Settings should be used with caution, as this can directly impact system performance and health. The most critical system settings are documented below.
| Setting | Details |
| browser refresh | Controlls update rate of the browser, defaulting to 60 seconds. |
| cookie | The name of the session cookie used. |
| default css | The default css scheme if a user has not selected one. |
| default login domain | defines the default login domain for users. |
| domain | the FQDN of the display server. |
| fast honeypots | Set to 1 or 0 – 1 provides instant violation detection. 0 provides lazy detection. |
| file cache | Timestamp used to sync the cache of files. Reset this value to 0 to force a cache sync between servers. |
| File lock time | The maximum time (in sescionds a file can be locked) defaults to 600 seconds. |
| Logs to keep | Defines log rollover. |
| Max audit age | Max age of audit logs (seconds) |
| Max trash age | Maximum age of files in trash (days) |
| Max versions | Maximum number of versions to keep. Versions are cleaned at 3am. |
| max_bad_pasword | Number of bad passwords before locking account. Only applies to local users. |
| ocr lang | Language for OCR |
| salt | Do not change – used for encryption. |
| schema | Schema version – used for cache. Reseting to 0 forces a schema cache refresh. |
| security alerts | Email address for security alarms |
| smtp encryption | encryption type for SMTP server |
| smtp from | the from address for alerts |
| smtp password | Password for smtp server. Value must be encrypted. |
| smtp port | Port for SMTP server |
| valid CSS modes | list of valid CSS styles for users. |
Login domains
Login domains provide the connection between external authentication systems such as SAML, Active Directory and LDAP and WebDesk.
Linking an LDAP directory
- Select “New LDAP Domain”
- Provide a domain name
- Provide the LDAP URI and port
- Provide the UID attribute
- Provide the first name and last name attributes
- Provide the looker account infomration
Linking a SAML domain
- Click “New SAML Domain”
- Provide a tennant name.
- Click “Generate keypair”
- Make a copy of the private key – This will be required for the SAML IDP
- Provide the SP details.
- Provide the IDP details.
- Click Save.
Linking an AD domain
- Click “New LDAP Domain”
- Provide a Domain name, this must be uneque from every domain name or tennant name on the system.
- provide the LDAP url for the AD server.
- Provide the LDAP search base
- The UID attribute is sAMAccountName
- The First Name attribute is givenName
- For the last name attribute enter sn
- Provide the infomration for the looker account.
- This will be provided by your AD administrator.
- This account will have read access to locate users in Active Directory
- Normal Use SSL should be turned on for Active Directory.
- Some sandbox envioments may need SSL turned off – but this is not recomended.
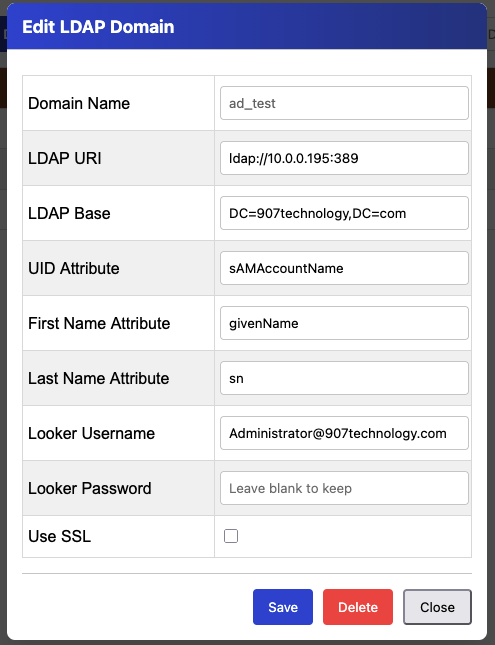
Above – Example AD Configuration.
The video below contains a step-by step setup guide for AD.
Creating a SMAL endpoint
- Configure the SAML IDP using the IDP provides documentation.
- Click “New SAML domain” from the “Login Domains” tab.
- Provide a tennant name, this must be system uneque.
- Provide the Entitiy ID, this is often the FQDN your endpoint.
- Enter the consumer URL this will the FQDN of the display server with /saml/saml/acs appended, for example:
- https://www.acmerockets.com/saml/saml/acs
- Binding, this will normally be:
- urn:oasis:names:tc:SAML:2.0:bindings:HTTP-POST
- Click Generate keypair
- Copy your private key and save it to a secure location – this will not be displayed again.
- Add the private key to your IDP application settings for webdesk. This is in your IDP portal.
- Provide the IDP details:
- These datails will be provided by your IDP, all are required:
- Entity ID.
- SSO URL
- Logout URL
- Certificate
- These datails will be provided by your IDP, all are required:
How SAML links groups
Due to the fact that group names in servies such as AWS are often a long array of characters each group has two identifiers.
- Group Name: The human readable name
- SAML Name: The SAML group ID passed from the IDP
If you have multiple SAML systems creating multiple group ID’s it will be necessary to create a new group for each upstream SAML group ID. In cases such as this rememebr to link the users applications to the new group.
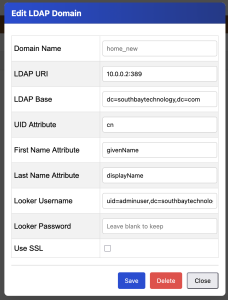
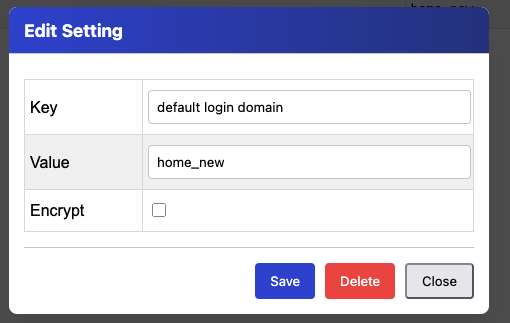
Setting the default login domain
- Open the Admin portal
- Select Settings
- Search for “default login domain”
- Click the value.
- Update the value to match your chosen login domain.
Troubleshooting login domains
For security reasons the login page will only display a generic “Access Denied” message if a login domain is down or misconfigured, this preventns an attacker obtaining backend infomration during error states. There are however several places to obtain login status information. Additionally it is important to consider that a login domain endpoint will not be contacted unless a user attempts to use that login domain.
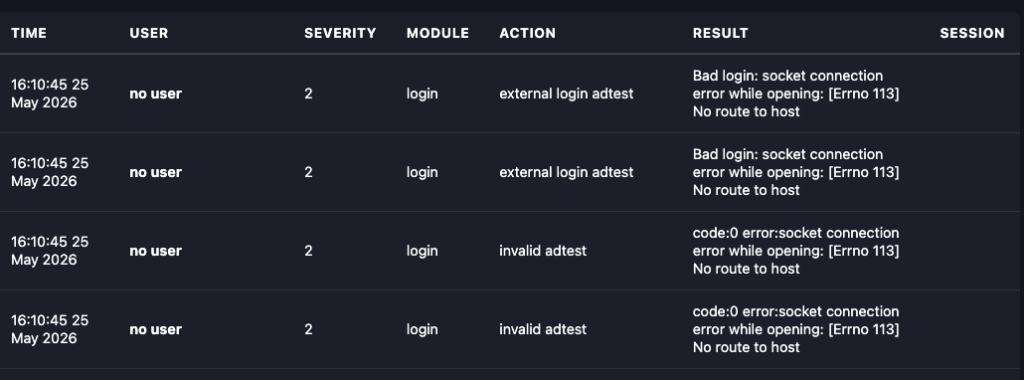
Checking from the Audit app
- Open the Audit app from the WebDesk Desktop.
- Search for events in the login module.
- Reslt will display the root cause behind the failure:
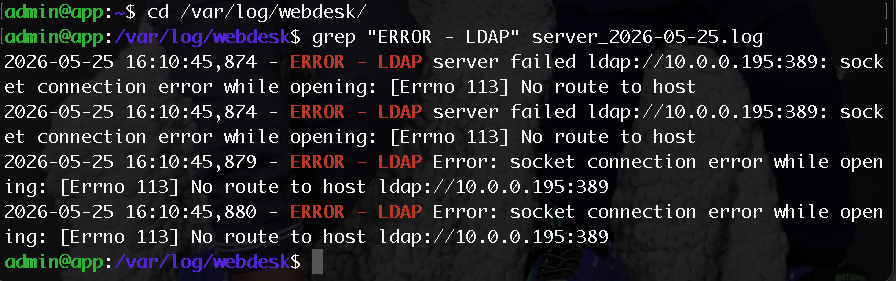
Checking from the console
- SSH to to application server
- Login as Admin
- cd to /var/log/webdesk
- Find the lastest server log file
- Run: grep “ERROR – LDAP” log_file_name
System Status
By default WebDesk Application servers check in with the backend database every minute with status updates. Cache refesh commands are also passed between the systems during these updated therefore they are vital to ensure a healthy system. In the event that file rights or applications are not updated between application servers, checking the system status will indicate if the application server is communicating with the cluser. What is normal:
- Processes – This sould be in the 200 range, anything above 300 suggests zombie processes are present.
- If you see this, reboot the appliance and check for patches or contact support for assitance.
- Memory use – Normally under 75%, add more the the VM if required.
- CPU use – This will spike during some background operations. Refresh the page for the next update if you norice this.
- Disk use – Expand the disk or delete logs if this is above 90%. Logs should however auto delete.
Licences
The licenses tab provides the current licence status and the install option for your new licence. As WebDesk is dedigned to function as an airgapped solution the server does not “phone home”, instead it depends on encryptred keys that are provided by tehnical support. When you licence WebDesk, our renew your licence two keys will be provided a “Site Key” and “Session Key” that togehter define the session limits and experation of your licence. 907 Technology will track your experation and attempt to contact you before your licence expires, however it’s important to keep on top of renewals yourself. Upon licence experation the system will default to evaluation mode limiting user sessions to five users.
Adding a login message
Out of the box a login message is not displayed by webdesk. To configure a login banner add an motd value in the system settings
- Open the admin portal.
- Click the settings tab.
- Search for motd, if a value does not exist it can be created.
- Click the value, set the value to your user message.
- Save the settting.
Audit Portal
The audit portal provides infomration an operational capability to the cybersecurity team. Five tabs are provided in the application:
📊Live dash
Provides a live view of data recoreded to the systems audit lab. This list does not refresh.
📘Reporting
Provides reports for the cybersecurity team in CSV format.
User Activity – Export the actions of a specific user.
File Activity – Actions in Webdesk Files that have taken place. Can be isolated by path.
Hot Activity – Actions that may be of interest to the security team.
CSV dump – Downloads all data for a timeframe.
🚨Alarms
Displays Webdesk Files security alerts that have triggered account restrctions on the system.
When an alart is triggered it must be resolved by cybersecutiy for access to the files application to be restored. Once an alert is resolved, access is automatically restored for the user.
✅Allowed users
These users protected from the activation of cybersecurity alarms. Use with caution.
🐝Detection
This allows the security team to esablish a tripwire and honeypot.
Tripwires
A tripwire activates once a user downloads or opens a specific number of files over a 5 minute period. Once this limit is exceeded it may take the system upto 5 minutes to colate the data and lock the users account.
Honeypot
This feature enables the security team to define a specific path that, when accessed results in immidate locking of a users account. When defining a honeypot several important points must be considered.
- Give the file an attractive name.
- Keep it away from folders that would be accessed during normal business functions.
- Ensure all users have rights to access the honeypot file ensuring comprimised accounts or insider threats can be detected.
- Don’t let system users know the file exists, it’s purpose or what will happen if the file is accessed. Insider threats knowing this may evade detection.